Little used and often forgotten, Turnips don’t get the attention that tomatoes or corn receive as major staples in the home garden, but for centuries, whole societies lived through the winter on turnips and potatoes. It may not be the most glamorous vegetable, but it doesn’t mind doing the dirty work: easy to grow, useful (you can eat the tops as well as the roots), stores well through the fall and winter, nutritious and versatile. A relative to the cabbage family, turnips taste delicious raw, roasted, mashed or in stews and soups.
Soil Preparation
Turnips prefer a sandy soil, rich in organic matter, well drained, and not too heavy. They also need full sun exposure. Before planting, incorporate 1-2 inches of well composted organic matter, Humic, and 1 lb. of all-purpose fertilizer (we recommend “That’s all it Takes” complete fertilizer or Happy Frog Organic Tomato & Vegetable Food) per 100 square feet and work them in to a depth of 4-6 inches. Heavy, clay-based soils must be amended with compost and organic matter to encourage and allow for good root development. For best results, add 2-4 inches of a variety of different types of organic matter and 50 lbs. of Zeolite soil conditioner per 100 square feet each fall for multiple years to increase drainage and nutrient availability. By doing this yearly, over time you can create a better growing environment for your garden plants to thrive in and produce. Please consult our Soil Preparation Guide in the attached appendix.
Planting
Turnips are almost always grown from seed and can be sown directly outside anytime after the soil reaches 40 degrees. Optimal seed germination is at 40-60 degrees, so the best time to plant in Cache Valley is in March and April, and again in August and September for a fall crop. Plant seeds about 1/4- 1/2 inch deep and cover with a light mulch, Coconut Coir, or potting soil (just a thin layer 1/4-1/2 inch deep) to prevent soil crusting and to help retain moisture. Try to maintain uniform soil moisture for 7-10 days or until the seeds begin to emerge. As the seedlings begin to grow, thin the plants out to 3-4 inches apart in the rows, and 12-18 inches between rows. If the plants are too close together, the roots will not mature properly, but the greens will still be productive and tasty. Just like the rest of the cabbage family, turnips prefer cool, moist weather.
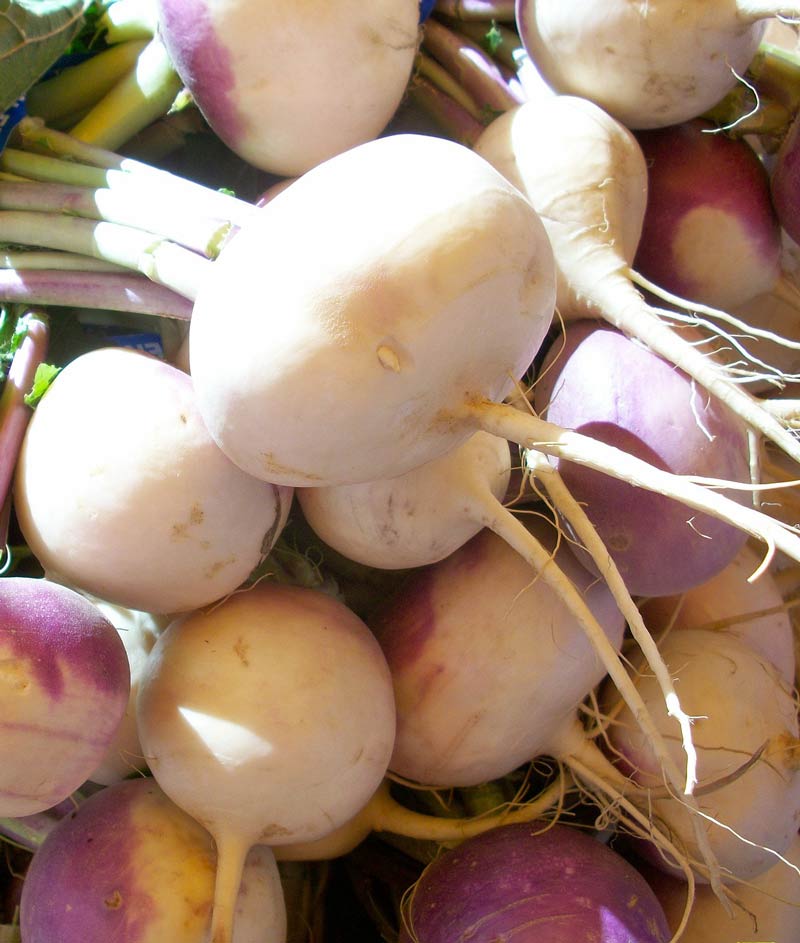
Varieties
Turnips are best known for the color of their roots, and in many cases, that is where their name is derived also. “Purple Top” has a white bottom, and purple top to its root, with nice, medium height, green, edible tops. There are many varieties to choose from, but Purple Top is a reliable heirloom we’ve sold at Anderson’s for 80 years.
Water
Turnips need regular water and consistent soil moisture to produce well. Use of a soaker hose and light mulches can assist in maintaining correct soil moisture and guaranteeing a healthy harvest. We recommend about 1-2 inches of water applied per week in 2-3 applications. Moisture fluctuations can cause root cracking, slow leaf development, and poor yields. Maintaining consistent moisture will prevent a loss of quality and taste (they go hot and pithy if stressed) and assist in proper root development.
Fertilizer
About 6 weeks after germination, apply a balanced vegetable food (“That’s All it Takes” or Happy Frog Organic Tomato & Vegetable Food) down the side of the row of plants and water thoroughly. 1-2 cups per 10 feet of row works well. We recommend the Tomato & Vegetable Food because it contains many micro-nutrients (like Boron & Iron) and beneficial microbes and mycorrhizae that increase water and nutrient uptake and encourage higher and better quality yields.
Common Problems
Turnips don’t compete well with weeds and therefore weed control is vital to their success. Hand weed when necessary, and use pre-emergent weed controls (Treflan or Corn Gluten) after germination to prevent new weed emergence. Flea beetles and aphids commonly attack turnip leaves and leave distinctive damage behind that can alert the observant gardener to their presence. Several safe and effective chemical and organic controls are available to stop these pests before they start - Ferti-lome Spinosad spray is an excellent organic choice, and Ferti-lome Triple Action Insecticide works quickly and safely to stop a wide variety of insects. The most destructive insect to attack turnips is the Cabbage root maggot. These grubs love to eat turnip roots and do a lot of damage in the process. Prevent them by treating the soil at planting with a general purpose insecticide like Hi-Yield Garden, Pet, and Livestock Dust or Hi-Yield Insect Control Granules. Another successful method is to plant the turnips as a fall crop, in late July or August, and the life cycle of the Cabbage maggots is over, and you will have grub-free turnip roots - almost guaranteed.
Harvesting
Turnips can be harvested as soon as the leaves are large enough to trim. Young leaves can be eaten raw or cooked. Heavy frost can damage leaves, so pick before hard frosts damage in late October or November. Roots can be used as soon as the roots begin to show mature size. Generally roots are mature in 60-75 days from seeding. If you let them grow longer, they tend to get more woody and tough. Use a digging fork to loosen the soil and pull up the roots and trim the tops. Roots store best if cleaned and stored at 35-40 degrees with a medium-high humidity. We have packed them in moist sand or peat to maintain the humidity in a cellar or cool basement for 2-4 months. Roots can also be left in the ground and mulched much like carrots for winter use (we haven’t done this before, but other local gardeners have had success storing them like carrots in the ground through winter).